Looking for a new opportunity as DevOps engineer
I am currently seeking a new opportunity as a DevOps Engineer, available from February 2026. I am open to remote or hybrid work from Prague, Czechia (Europe), for a long-term, full-time position or B2B contract - 300 EUR / daily. Please feel free to contact me for further details. You can also review my professional background on my LinkedIn profile.
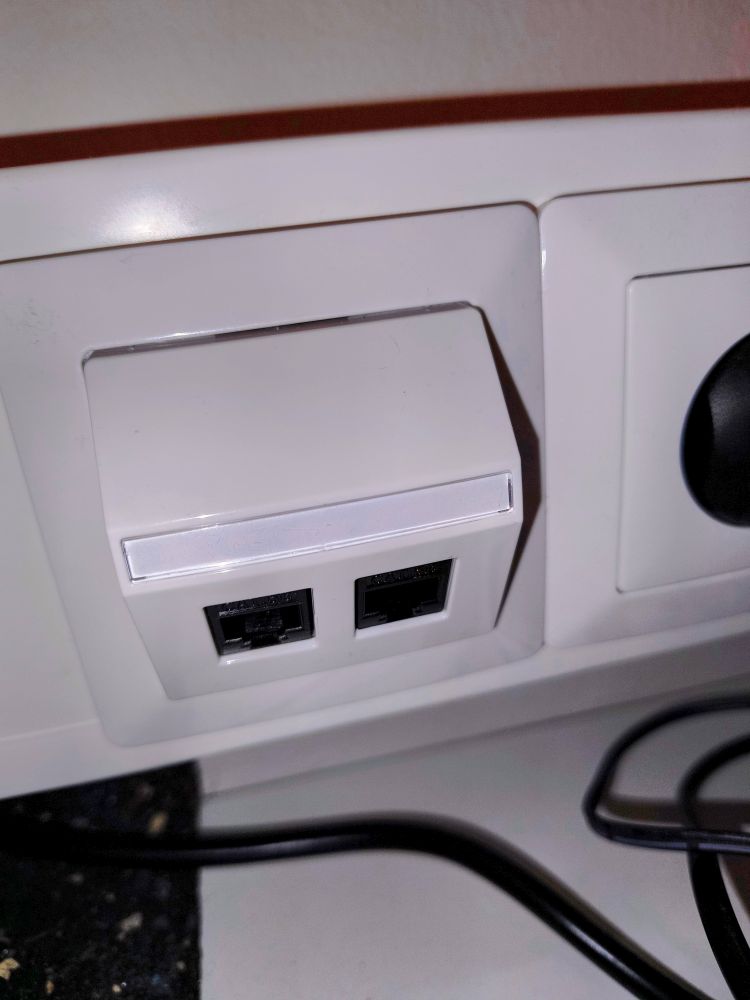
Installing RJ45 Wall Sockets into a Kopos 110 mm Cable Duct
When you want to integrate data outlets neatly into a trunking system, the combination of Kopos ducts and ABB Zoni components offers a professional and visually clean solution. This guide explains how to mount an RJ45 outlet into a 110 mm Kopos cable duct using specific parts from K&V Elektro and provides practical installation tips.
Components Used (from K&V Elektro)#
- ABB Zoni kryt datové zásuvky bílá 5014T‑A00418 500 – Cover for data socket Catalog number: 2CHT290418A4500 / 1998906 Product link
- ABB Zoni rámeček bílá 3901T‑A00010 500 – Faceplate frame Catalog number: 2CHT010010A6500 / 1998907 Product link
- Krabice Kopos KP PK HB – Installation box suitable for ducts, Catalog number: 1181499 Product link
- Konektor keystone Keline KEJ‑C5E‑U‑BK RJ45 Cat.5e UTP 1208‑10 – Modular jack for data networks, Catalog number: 1177299 Product link
- Šroubky KOPOS pro upevnění nástavných rámečků a přístrojů - Screws, Catalog number: 1178084, Product link
Installation Overview#
The Kopos KP PK HB box is designed for snap‑in mounting inside a 110 mm cable duct. Into this box, you can attach the ABB Zoni frame and data outlet cover, forming a clean modular front. The Keline keystone connector fits into the ABB Zoni cover, allowing a standard RJ45 termination.
Tip: These ABB components are from the Zoni design series, made of halogen‑free thermoplastic with a glossy white finish, matching domestic or office installations.
Step‑by‑Step Procedure#
- Mount the box: Insert the Kopos KP PK HB box firmly into the Kopos 110 mm duct. Ensure it sits flat against the edge of the duct opening.
- Secure the box: Use four screws to fasten the box; these are not usually included in the packaging, so be sure to have suitable ones ready (4 × 20 mm screws are typical).
- Terminate the cable: Strip the outer jacket of the Ethernet cable and sort the wires according to the T568A or T568B standard.
- Insert wires into the keystone: The Keline KEJ‑C5E‑U‑BK connector uses an easy snap‑in IDC system. Pair wires correctly and press each firmly into its groove.
- Use a keystone punch‑down tool: Although this type of keystone is designed for simple installation, using a dedicated punch‑down tool — available inexpensively on AliExpress — ensures perfect contact alignment and reduces the chance of incomplete seating.
- Assemble the front panel: Snap the terminated keystone into the ABB Zoni cover, attach it to the frame, and align it with the Kopos box.
- Tighten everything: Use the four screws to secure the assembly. Ensure the keystone is flush and the cables aren’t strained.

Installation Notes#
- Always check the orientation of the keystone jack before snapping it into the cover — most are angled for easier cable entry.
- The Keline keystone snaps into place very lightly and securely, making it friendly for non‑industrial installation tasks.
- If installing multiple outlets in a duct, maintain spacing to leave room for cable bends inside the trunking.
Properly mounted, this setup provides a clean, modular, and future‑proof data outlet solution perfectly integrated into your cable management system.
Looking for a new opportunity as DevOps engineer
I am currently seeking a new opportunity as a DevOps Engineer, available from February 2026. I am open to remote or hybrid work from Prague, Czechia (Europe), for a long-term, full-time position or B2B contract - 300 EUR / daily. Please feel free to contact me for further details. You can also review my professional background on my LinkedIn profile.